NetBSD

NetBSD

NetBSD


For those of you who have followed me, it’s no secret I am a fan of Netbsd. I have been using it since v1.x and it’s not at v9.x. Anyhow, I have been playing around with putting it on a spare laptop lately and though this would be a good place to share some notes..

The Install:
The install itself is pretty straight forward, although I didn’t really try a usb install (did do a vm/iso tho) because I am using an older laptop, so I settled on burning a cd for it. One of the issues I faces during the install was I wanted to install pkgin (which is a binary package installer) but it wouldn’t download during the installer because the installer has no method of configuring wireless for wep/wpa/MSCHAP, etc.. I am sure you can install from a wired connection though.
Since I didn’t have a wired connection on this laptop (too lazy to dig for a cable and ports) I just decided to take care of it after the install.

Setting up wireless:
I have to say.. The worst part of NetBSD is the freaking online documentation. It took me forever to find this..
as root: wpa_passphrase *myrouter* *mypassphrase* > wpa.conf
This will generate a file (wpa.conf) that looks like this:
network={
ssid=”myrouter”
#psk=”mypassphrase”
psk=”myencryptedpassphrase”
}
And I changed it to:
network={
ssid=”myrouter”
psk=”mypassphrase”
#psk=”myencryptedpassphrase”
}
And then I rebooted and did an “/etc/rc.d/wpa_supplican onestart” followed by an “ifconfig” to verify that the network was connected and then:
/sbin/dhcpd
Which got me an address on my network.

Adding pkgin for binary package management:
$ export PKG_PATH=”http://ftp.netbsd.org/pub/pkgsrc/packages/NetBSD/amd64/9.0_current/All/”
$ pkg_add -v pkgin

All the rest:
At this point you can add all the other goodies you like, for instance bash by doing a
$ pkgin install bash
and other great things to install like vim and screen and on and on. Enjoy!

Burrow.io redeux

Smol Internet

Smol Internet


I mentioned before that I was dissapointed that burrow.io went down. Well, I totally forgot to mention when the came back up again, like a week ago. I also wanted to mention that when I finally got ahold of them via email, they were super nice and apologetic. Seems they ran afoul of a couple hoting providers after they got infected with a few spammers. They have since taken care of that problem and all is well! Check ’em out!

Burrow.io in the hole

A few posts ago I mentioned how I got a sub to burrow.io and was using iut to host my #Gemini capsule. Well, it has been down now for 4 days – of course right after I sent them money :/
Anyhow I have waited long enough – I mean, hey, my gemini capsule was at the end of that! I decided to jump on the ngrok bandwagon and 10 minutes later my gem,ini capsule (site) is back up and online. You can find it (right now) at gemini://2.tcp.ngrok.io:14788
That’s gemini://2.tcp.ngrok.io:14788 (you’ll need a gemini protocol browser)..

Speaking of my gemini site (66block), there is a bunch of new content on there as I wrote a little script to convert rss feeds to gemini.

Go check it out!

Not BIG but smol

Smol Internet

Smol Internet


So waaaaaaaay back when the internet was a new thing, snuggled right in between BBSs and WWW you found things like Gopher, which was an early protocol used for browsing information on the early web in a text based format. Ahh, the memories. Along with some usenet you could just get lost for hours and hours. As it turns out, gopher never really went away, just sort of became subversive, well, that is, until recently.

Recently there has been a cultural resurgence in the less cluttered internet – they call it the “Smol internet”. Not only has Gopher really started making a comeback, but there is now a brand new protocol called “Gemini“, which sort of rides the lines between Gopher and WWW – not either one of them (but, imho definitely Gopher leaning).

Lately, even I have become rather enamored with the smol internet which not only seems quaint but somehow mostalgic and new all at the same time. I guess you can blame the good folks over at https://fosstodon.org/ for that one. And iof you haven’t been over there, head on over and join in on all the fun. Anyhow, as it happens, I had a couple free days over my birthday vacation to actually play with some of this stuff uninterupted and decided I really wanted to host not only my own gopher hole (cute huh? That’s what they call a gopher site.) but I wanted to give a shot to hosting my own gemini capsule too (again, what they call a gemini site).

Down the gopher hole I went. I have these raspberry pis just hanging out begging to be used for a project, so why not a gopher hole? Nope, I couldn’t think of a gfood reason why not either. As it turns out there are like a jillion howtos on how to do this but being uber lazy I chose the easy one which was to just install pygopherd right out of the debian repository and just say go. That pretty much did the trick except for one thing, all my home servers/machines are behind a nat and I am not about to flip around my entire internet service in order to just host a gopher hole me and 5 other people will ever hit. After a little research it looks like there are some solutions for this called localhost tunnel providers which create a tunnel from their end out on the net into my machine. Truns out most of these guys only do http/s or ssh tunneling so I dug around a bit more and found one called burrow.io who will let you do straight tcp (BINGO!). You can use their service for free in a limited capacity but since I know I was going to make more used of it I bit the bullet and purchased a year service (cheap) and a couple config options later and I had my very own gopher hole running in the smol web. If you have a gopher capable browser (if not, get one) point it to gopher://io.burrow.io:12160 and check back often as I add content!

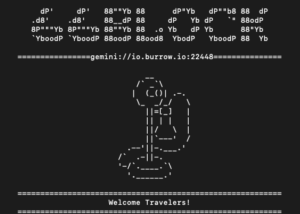
Next was Gemini. This is really the new kid to the neighborhood. As I mentioned it’s kinda like gopher but newer, sleaker and way more secure. Gemini uses ssl security on each site. This bit me suring set up. I must have tried 10 different gemini servers on that same raspberry pi but couldn’t get them to work – almost all the php and python varients. There were a couple I did get working but only locally. You see because of the ssl I have a real issue with passing through a localhost tunnel. No matter what I did, the names didn’t match. Finally I moved off the pi over to a KVM virtual machine instance I had running looking for a project and settled on gemini-php, which was pretty much a drop in go solution. I put the localhost tunnel on that and BINGO. Now I also have my own gemini capsule you can visit with a gemini capable browser at gemini://io.burrow.io:22448
I should mention that in my opinion giving this a cutsie name after the space gemini project was probably not a fantastic idea. Any search for the gemini server software was basically futile, as for the cients and capsules (sites) as well. Make sure to use the word “protocol” in your search soemwhere and you’ll have somewhat better luck.

Anyhow, if you want to geek out a little bit on the newest old stuff, or just enjoy the slower or text heavy interwebs, please come meet me there. This has been a lot of fun!

Raspberry Pi Wifi Redux

Raspberry Pi
OK now. You heard me describe in my last post how my raspberry pis don’t hold a wifi connection persistently. This weekend, after a little googling, I believe I have found the answer to that problem. Well, technically, 2 answers. And I am not sure which one works, so I am using them both 😀
The first answer is to edit the /etc/network/interfaces file and add the line “wireless-power off” and then do a reboot. That should turn off wifi piower saving, which in turn should keep the wifi running.
The second answer is kind of like the first. Edit the /etc/rc.local file and add “/sbin/iw dev wlan0 set power_save off” and the save. This file will run *right before* you are able to login and tells the wlan0 (your wireless controller) to turn off any power saving, which, like the above, should keep your wifi connection alive and responding.
Lastly, reboot to make sure both fixes are in the system and working. If you don’t see me posting more on this annoying problem or more fixes then that means one or both of these have worked 😀

Hosting a website behind a NAT


So, for a long time, I have wanted to be able to host a publicly viewable website from my machines @ home, but I have been prevented from doing so because I am behind a NAT. For those of you not in the know, being behind a NAT is the typical setup for internet providers. They give you a modem of some sort which connects you to their network in one of thei addresses and they then forward your traffic to the internet proper. What that means is your computer address is not really itself on the internet. Tzo further complicate things, if you also have a persona router hooked up like I do that assigns its own addresses which further obfuscates your connection from the internet.
To get past these things you can use a “localhost tunneling solution” which basically creates a tunnel through all that mess from your local machine to an endpoint that is reachable on the internet – so you can host your own website or other service. I wanted to try using one of these to push content to the web so I set out researching which companies proivided this kind of service. As it turns out there are quite a few now. The gold standard, it seems, is one called Ngrok, however, ever the cheapskate I am, I needed some comparative shopping which landed me here where I saw PageKite which seemed to have great features (like not just http/s connections) and was cheaper for paid plans than Ngrok. Winner winner chicken dinner!
Raspberry Pi Enter the Raspberry PI. I had a few of these laying around and I though one would be fantastic to try this new tunnel provider on and host a static web page to try it with. I set about inatlling Raspberry Pi OS and then apache2 and a cute little web page with the Grumpy Cat (above). Once that was running I added the PageKite software (which is very easy), set up my PageKite account (required) and picked a subdomain (http://66block.pagekite.me/) and I was up and running. Brilliant!
Until……………..
My new website stopped working. This took only minutes. I was so frustrated. No matter what I did, the website would stop working after a couple minutes. I figured for sure this was some kind of issue with PageKite and they just didn’t hold a persistent connection. I fiddled with settings for hours until it dawned on me that I was using the wireless connection on my raspberry pi to host all this stuff and my raspberry pis are notoriously slow when connecting to them wirelessly. The raspberry pi’s wireless connection was what was failing me and not holding a persistent connection, which was causing the PageKite software to fail. I moved the website and PageKite to a virtual machine I have been testing (Oracle Linux) and my PageKite test site has been running now for over 24 hours just fine. Eureka!
** Note: I do want to mention that this ONLY appears to be a problem with *wireless* on the raspberry pi. I have another raspberry pi which is connected via ethernet cable currently running my nertwork storage and it is always immediately accessible.

virsh frustrations

Some of you, I hope, will be familiar with a command called “virsh”. This command in Linux is the shell command to control KVM VMs. It works great, if you know how to use it and, for the record, KVM is a fantastic virtual host environment. Although I have run my home server infrastructure on it for a couple years now, I still am learning new things all the time and there is much more to learn and try.
Today’s issue was caused by a typo. I went to disable selinux (blech) on a machine and I made a typo in the /etc/selinux/config file and rebooted the machine, which promptly hung on the reboot forever. The fix is simple – get into that file and fix the typo, but how to get to get in there when the machine doesn’t work? Well, you, of course, need to pass a boot parameter to get the machine to ignore selinux, but for the life of me I couldn’t get into the booter from KVM. KVM was just too freaking fast for me to start the VM, get into the console and press “e”. Sometimes I wonder if this weird stuff only happens to me. Anyhow, I had to start the VM in the paused state “virsh start vmname –paused” and then I could connect to the paused console. After that I did “sleep 2; virsh resume vmname”, which gave me 2 seconds to get over to the console and start pressing the “e” key before the vm actually resumed and booted. That did the trick! From there I was able to pass the boot parameter I needed “selinux=0” and boot up and fix the typo.

RHEL for FREE?

RedHat

RedHat


So, as mant of you know, RedHat has efectively killed CentOS as a free alternative to running RHEL at home. Because of the blowback from that announcement (I’m sure) then have changed their license for developer use to allow up to 16 servers. This developer license is free and you are free to use those servers for whatever.
But how do you get such a thing? Well, head on over to this site and register yourself. Be aware that your user name is your email address you register with. You’ll need that for later. Also, make sure you remember your password, you’ll need that too.
Once all that is taken care of you can hit their downloads section and grab yourself the latest and greatest release of RHEL and do the regular install. Personally I am installing via the command line on KVM, but you could do a GUI install if you like and you can do it not only virtualized but on real hardware!
The install proceeds normally until the reboot wherein it asks you (only one time) for License information. You must accept.
At this point you might think you would be able to do updates but WRONG! You must ALSO register your system. I did this on the command line by doing a “sudo subscription-manager register” and then putting in my user name from above and then my password from above. THEN you will also need to attach your appropriate subscriptions to that registered server. I did this on the command line by doing “sudo subscription-manager attach –auto”. NOW you are able to do your updates on the system “yum -y update”.. Enjoy!!
Oh, and I have comfirmed that this developer registration does indeed work on more than 1 system!

I’m a slob

Tide Vs Shout

Tide Vs Shout


Yup, that’s right I’m a slob. It has been rightly said before than I often wear my dinner.
I don’t think I have ever worn a white shirt without some kind of tomoto sauce stain on it, and certainly not more than once.
So, that brings me to this post. Many years ago I smartly started carrying a Tide To Go pen with me for those emergent stain removal needs, like after I eat or drink anything at work. For those of you who are unfamiliar with Tide To Go, it’s a magic little orange pen which contains a stain remover and you just sort of write over the stain like a marker and most of the time, when it dries, the stain will disappear. Well, it seems that pen has become either wildly popular or is not being manufactured any longer and hard to get. I had to find a suitable replacement. What I came up with was Shout Wipe and Go. This, unlike the Tide pen, is a wipie cloth. You simply pull the little cloth out of the packet and wipe your stains away and then toss the cloth. I have to say I was kind of worried about this. For one thing you have to carry multiple packets around with you. This, however, turned out not to be a huge problem. They give you a bunch in the box and you can just throw a couple in your briefcase or pocket and they are pretty unobtrusive. The other worry is that the packets would dry out. I usually carry some kind of glasses wipes in a similar packet with me, and I have noticed many times that when opened , the wipe has dried out. Having this happen to the Shout wipes in time of need would be a disaster. I bought them anyway (not a lot of choice). And then Covid hit and I started working from home. They sat for a year and I pulled one out this morning and it worked perfefctly. I guess drying out is not such a problem with these. Good packaging!
So, if you are also a slob, I highly recommend either product, but I think the Shout wipes are going to be WAY easier to find.

WD-40 Nugget of wisdom

WD-40
In an absolutel flurry of new posts (2 in 1 day – whoa!) I wanted to drop in a nugget of wisdom.
I have seen a lot of instances where people are trying to remove stickers and sticker residue for a variety of reasons and I am always telling them that they need to use WD-40. Seriously, this is the best stuff to use for that. For some reason people default to using alcohol and then the have to scrub and scrub.
The reason I am mantioning this is I have this roku remote where the battery door tab has broken off and, like any professional home fixer-upper, I just stuck it down with a piece of tape. Well, today the tape came off and what was left was a thick icky sticky residue. I just grabbed my WD-40 can, sprayed the residue and wiped it off with 2 swipes of a paper towel and that was that – new piece of tape on and the remote was fixed again (as much as I am going to, anyhow).
So, the moral of the story is, don’t scrub your stickers and sticky residue for half an hour with alcohol, just a quick spray and wipe with WD-40, which you should have in your home arsenal anyhow.