Video4Fuze

video4fuze
WOW! Dann pulls through again!

I have had my Sansa Fuze for quite a while now and I completely dig it. It’s just simply one of the best “mp3 players” out there. Of course it does much much more than that . It plays Ogg natively and other formats too, and it’s not DRM magnet either. It also has a great fm radio tuner and does slot radio to boot.

The only thing I have not gotten it to do is video. It has some wacky format that it uses and no matter how many attempts I have made at it with ffmpeg or mencoder I get bupkis. That is, until last night.

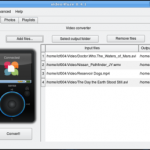
You see, Dann broke his Sansa Clip a couple weeks back and for a replacement he ordered a Sansa Fuze. He received it and was reviewing it on the TechShow and mentioned that the video worked great. When I asked him how he got it working under Linux he pointed me to http://code.google.com/p/video4fuze/. Absolutely Brilliant! I downloaded this software and tried it right away, and, just as Dann had said, it works flawlessly. This truly completes and rounds out the Sansa Fuze for OpenSource users.

There really is nothing bad I can say about this little player now. I highly recommend it. I also highly recommend trying out Video4Fuze to encode a couple videos for your new player.

Almost time for me to go watch a movie! 🙂

Fedora 12


It’s no secret that I have been pretty critical of the Fedora project in the past. I make no bones about my opinions that they have, in the past, released too soon, without doing the proper testing, and have sent out fundamentally broken distributions (albeit nice looking).

That was until now.

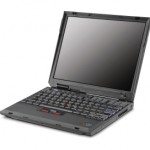
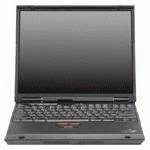
As a Linux enthusiast, I do try and keep up things and recently the Fedora project released Fedora 12. As I have this great new Thinkpad X31 test laptop now, I found it impossible to resist testing the new Fedora. I have heard from so many people who absolutely love Fedora, I felt that I , so far, have been cheated of being able to play with it because of the previous issues I have had with the distribution.

The very first thing I noticed was the download time to actually get an iso. This distribution is either wildly popular or they have amazingly crappy mirrors. It took several *HOURS* for me to get a copy of the dvd iso, and this is many days after the initial release and I am on a particularly speedy internet connection.

Once I actually did have a copy of the iso, I used unetbootin once again to get it on some media that I could install from on my Thinkpad X31 (no cd/dvd drive). No matter what I did, I could NOT get an install to work this way. It’ll boot and give you an error about not being able to find the root partition or some such thing. Anyhow, I tried several times and even re-downloaded the iso just to be sure. After checking some search engines it appears that this problem has been around for some time now. Undaunted, I decided I WAS going to get this installed and I downloaded the netboot iso, used unetbootin to put that on a flash drive and mounted up the dvd iso on a spare webserver so I could net-install from there (sounds harder than it is, really).

Once the install was actually working, it went right along at a good pace. The installer is all graphical and asks you the appropriate questions to get your system up and running. It’s nothing difficult and nothing that the average person wouldn’t know or couldn’t figure out. A few mouse clicks here and there and a password and you’re working.

Once the install is done, you give it a quick reboot and kerplowie, you’re running Fedora 12.

The first thing I noticed (other than this release actually boots up) is it’s FAST. I mean F A S T. I don’t know what these fellows are doing but it sure seems the right thing this time. My boot time in F-12 was noticeably faster than even Ubuntu 9.10 and I truly dig anything that gets me to my desktop quicker.

The desktop itself is quite strikingly beautiful. This is one of the things that I have always admired about the Fedora project, though. Their artwork has always been top notch. This is in striking contrast to what I usually feel about Ubuntu’s brown desktops. Underneath the pretty is the gnome desktop, which works quite well, is very integrated feeling, and has become the standard enterprise desktop.

Lastly, networking is flawless. I expected it to be, but then again, I expect it to be flawless on all distributions and many times it is not. This is worth note because both CentOS and RHEL workstation require a little jiggling to get wireless going on my laptop and Fedora comes off the same shelf, so to speak.

The only problem I have encountered so far is shortly after I boot up, on most occasions, I get a notification on the top task bar about kernel error/warning. When I click on the notification icon I am asked to send a bug report in and when I say yes, it fails. Unfortunately there really isn’t a lot of other information on the error – it’s not very descriptive or helpful for that matter. Nothing appears to be broken, everything works so this is really only a minor annoyance and, for all I know, something I inadvertently screwed up myself.

Of course, there are a few things I still want to check out, like multimedia playback and such, but overall I am quite impressed with Fedora 12 and would recommend it as a decent and quick general desktop.

Addendum:
While travelling abroad where it would be legal to do so, you could follow the directions here and also this one. Make sure to hit them both for everything you need (and you might want to add vlc to the yum install on the last one too).
‘Tis the season

FreeLinuxBox

FreeLinuxBox


What’s your tech wish list look like? I know mine is pretty impressive as they are always coming out with something I am sure I could make great use of.

That being said, there are a LOT of people out there who would love some tech themselves but just can’t afford it. I say, let’s compromise! Do yourself and others a favor by cleaning out your old computer inventory and putting it up on FreeLinuxBox. You can make some room (and a good excuse) for getting your new whizbang laptop while simultaneously giving the gift of a working Linux computer to someone who could really use it. Don’t wait or hesitate. Do it now and you’ll be glad you did.

You may be thinking that nobody wants your old junk, but let me assure you that is not the case. I just recently put up an old used laptop with a bad display and I had several people emailing me asking for it within mere hours. Unfortunately, I had to turn them all down but the one who got it. They are waiting for you to post yours now.

It’s really simple. Get your old computer out, the one that you were saving for your kids when they get old enough, or the one you were holding on to for that special project you will never do. Install Linux or BSD on it and make sure it works. Write down the specifications of the machine like make/model/ram/hdd etc. and post them on FreeLinuxBox. It only takes a few minutes and you can be making someone really happy with their new Linux/Unix toy within just a few hours.

Slackware 13

sw
I decided to give Slackware 13 a try on the new Thinkpad X31. Since there is no cd/dvd drive, I had to resort to unetbootin to get things going. I downloaded the dvd iso image and, through unetbootin, stuffed it on my trusty 4bg usb thumb drive. For some reason, this took 4 tries to be bootable, but did eventually work…mostly.

Slackware’s installer hasn’t changed since I started using it years ago, that I can remember. That being said, it’s a fairly straight forward and simple text interface menu system that you go through step by step. Since I was using a USB drive to install from I picked the “install from a mounted directory” option, hit alt-f2, made a directory and mounted my usb there (mkdir /linc ; mount /dev/sda1 /linc) and used the /linc/slackware directory as my source directory. Sounds a lot more complicated that it really is. The problem with that was that I apparently had a corrupt package on my usb stick and halfway through the install everything stopped. This was remedied by starting the install again and picking “ftp or http install”. I stuffed a copy of the slackware directory of the iso I had downloaded onto a spare webserver for a few minutes and pointed the installer there. That worked like a top. I selected to do a full install of everything.

Booting to Slackware was a lot tougher. Still having learning curve issues with Grub 2, I turned to the web for some help and after a few searches and trials came up with this:

exec tail -n +3 $0
menuentry “Slackware 13” {
set root=(hd0,6)
linux /boot/vmlinuz-huge-smp-2.6.29.6-smp ro root=/dev/hda6
}

Once everything was booted (Slackware seems to boot quite fast btw), I was dropped at the familiar login prompt (no fancy gui’s here folks – at least not by default). I logged in as root and set up my regular user account.

useradd -m linc
passwd linc
vigr
* add your user to wheel
* add your user to disk
* add your user to plugdev
* add your user to power

To be honest, I have no idea if I really needed to add myself to the disk and power groups but, hey, while I was there…

From there, I logged out of root and logged in as my user and then issued a “startx” which started my fancy KDE session. To be honest, I am not all that sure I like the KDE 4 series yet. It’s a little cartoonish to me and I definitely do not like the default menu system. I haven’t used it enough to really comment on it yet though – I may just end up liking it the more familiar I become with it. The familiarity will have to wait ’till I finally get wireless working though 🙂

Gparted rocks

I just wanted to write a quick note about gparted. This has got to be one of the most handy pieces of software on the planet.
gparted
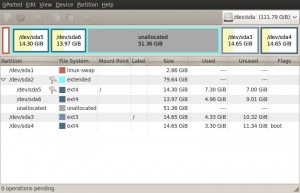
As you know, I have been doing a lot of different distribution testing on my test laptop lately. Well, one thing that didn’t occur to me until too late was that I can only have 4 primary partitions on a drive. Yes, on the 5th OS I had one of those “DOH!” moments 🙂

livecd of Ubuntu because I cannot move around a partition I am actively using. I moved 2 primary partitions to the end of my hard drive’s free space. I then extended the size of my extended partition to encompass all the free space on my hard drive. With gparted, this was a simple drag and click procedure.

20 minutes later (hey, 30gb data to move around) and I was set with a pile of free space in my extended partition so I could continue doing installs 🙂

I did it!

One month ago I decided to take the challenge and see if I could blog all month long for November’s National Blog Posting Month. I was absolutely sure that I would fail.

Amazingly enough, I did not.

So, what does this mean? Does it mean that I will continue posting an entry every day? Not a chance. Does it mean that I have somehow fulfilled my childhood dream of being a writer? Nope. Did it even help to make me better at writing? Well, that is subjective. I believe that it proved to me that I can muster the discipline to write something down if I need to, if there is a goal involved. Whether my writing style or content was any good is really your call, as I am slightly biased and sometimes overly critical as well.

What I would love to see come out of this exercise is encouragement for other bloggers. If I can do this, surely anyone can, and I do enjoy seeing posts from my friends on LinuxPlanet.org. My challenge is for my friends there and you who read this blog to pick up the torch and whip into a blogging frenzy! Seriously though, it can’t hurt for linuxy and geeky folk to flood the web with some interesting stuff. It’s good exposure and great entertainment.

So, who’s next? Who will take my challenge? Dann? Pat? Allan???? 🙂

Ubuntu 9.10 and Grub 2

ubuntu
Yes, another post about Ubuntu 9.10. I know I tried it out before, but I put it on this new (old) laptop and am giving it a little better run this time. I still believe 9.10 (Karmic) to be a fine running distribution and this time I got to test out my method of installing all the codecs I want on there, along with messing with Grub 2 a little bit.

When you are travelling abroad where it’s legal to do so, as i was just the other day, you might want to have access to all those codecs that make life worth living on a linux box. Things like listening to your mp3s and watching your dvds and miscellaneous media files are very dificult without them.

I realise that Ubuntu has, for some time now, been able to detect that you need so and so codec to play so and so media and ask you if you really want it installed, but I find that particularly irritating. I like to already have that functionality there when I want to use it. To do that, I have a little script that I use that generally takes care of that for me, along with installing most of the programs I need to make my day to day use hassle free.

#!/bin/bash
sudo wget http://www.medibuntu.org/sources.list.d/karmic.list -O /etc/apt/sources.list.d/medibuntu.list
sudo apt-get update && sudo apt-get install medibuntu-keyring && sudo apt-get update
sudo apt-get install mozilla-thunderbird php5-common php5-cli php-pear subversion openssh-server clusterssh imagemagick vim synergy smbfs curl vlc libdvdcss2 ubuntu-restricted-extras w32codecs mplayer mencoder build-essential sqlite dia expect mysql-client

Feel free to modify and use this, but basically I derived this from paying attention to the programs I need and use and making a list. It really does save a lot of time to do this.

The other thing I wanted to mention is Grub 2. For some reason, someone decided it was time to move from the original Grub to Grub 2. Time alone will tell whether that was a smart move or not. I know I certainly had a tough time of it for a day or two. Everything has moved and the methodology has changed as well. The short of it is you have some config files in /etc/grub.d that you can now manipulate, along with issuing a “update-grub”, that will build your /boot/grub/grub.cfg, which is pretty much the equivalent of the old /boot/grub/menu.lst file. The fun part is figuring out how all this works because, as it happens with open source many times, the documentation sucks.

What I needed to do was to add another linux distribution to grub so I could dual (or multi) boot it. This is accomplished in that /etc/grub.d directory. Now it’s worth mentioning here that if you do multiple OS installs on your machine and just issue a “update-grub” on your base Grub 2 enabled OS, it will (or at least mine did) auto detect this installation by default and add a boot option for it into the grub boot menu. The problem is, like mine, it probaly won’t boot your other OS.

The way to fix this is to go into /etc/grub.d and “chmod -x 30_os-prober”. After that you won’t be auto-genning entries. Next you can make a copy of the 40_custom file (I named mine 41_centos) and edit that file to have the correct boot parameters to boot your other OS. This is especially fun without having a good grasp of the correct syntax. For instance it took me hours to figure out that the “kernel” line that the old Grub used has been replaced with a “linux” line now. Other than that, though, just make sure that if you are booting another linux to use the correct root label and kernel and initrd image names and locations. My correct and working CentOS entry looks like this for reference:

#!/bin/sh
exec tail -n +3 $0
# This file provides an easy way to add custom menu entries. Simply type the
# menu entries you want to add after this comment. Be careful not to change
# the ‘exec tail’ line above.
menuentry “CentOS 5.4” {
set root=(hd0,3)
linux /boot/vmlinuz-2.6.18-164.el5 ro root=LABEL=/ rhgb quiet
initrd /boot/initrd-2.6.18-164.el5.img
}

Have fun!

Saved by Stuart

thinkpadx31
This is the final chapter in the saga of my broken Thinkpad T23.

Many of you know that I have been using my T23 for testing distributions lately, and before that for a headless server. The reason for that is that the machine has this flaky video problem where sometimes it works, sometimes it does not and other times it “sort of” works. As you can imagine, that is not very conducive to testing out desktop distributions. I certainly has been problematic lately.

I have been lamenting what to do with this especially this month as I have been trying to generate some content for the blog. How am I to do distro testing and such without a desktop machine to test on? The solution came the other day in an email from an old LUG member.

It seems that Stuart, a member of my old LUG, who’s mailing list I am still subscribed to, had a couple spare laptops he was offering up. He posted them to the list and I just happened to be watching my email when the post went through. I jumped at the chance to replace my old beater with something almost as old but fully functional. I arranged to go pick up my new(old) machine that very night.

For a measly $25 and 4 hours worth of drive time I picked up a nice little Thinkpad X31. It has 1.5gb of ram, 120gb hdd, internal wireless B and G and will make a great little laptop to do multitudes of testing on. It even came with Windows 7.

Now I didn’t keep Windows on the laptop, in fact it got a clean Linux install the second it hit my house, but on the way home, I did get a change to check out W7 a little bit. Honestly, I think XP was windows done in crayon and 7 is windows done in maybe sharpie or something. In my opinion, Windows 7 is trying very hard to be a rip-off of OS X, except they have this cartoonish interface. It’s not very professional looking (to me anyway) and I can tell you for sure that Linux on the same machine completely blows it out of the water. In two words, I found it cartoonish and clunky.

Just to tantalise you a little, since I brought the machine home I have attempted to install 5 concurrent distributions on it and actually put 2 of them on. I also learned a lot in the process about Grub 2, but all that is for a different post on a different day, so keep watching and reading!

It’s so easy!


I have heard, so many times now, that windows is simply just easier to use than Linux. Some people say it’s more intuitive. Well, today I had the pleasure of having to configure a network printer on my windows xp vm, and I call bullcrap.

Now let me put things in perspective a little bit. I have been using Linux almost exclusively for a very long time now and I do recall watching and using it through it’s growing pains when many things weren’t quite as easy as they should have been. We, however, have come a long way, baby.

Now I haven’t really extensively used windows in quite a while so I may be a little handicap for me, and it also might insinuate that I am partial to Linux’s way of doing things. You’d probably be right, but let’s just compare what needed to happen to get the very same printer configured on windows xp and on Ubuntu 8.04(lts).

Windows XP:
Start->Settings->Printers and Faxes->Add a Printer->Next->Local Printer. Now this is where it completely lost me. *I* was under the impression that I was trying to access a NETWORK printer. However, the local windows admin assured me that I had to choose “local”. You click next and let windows *fail* scanning for a local printer and then click next again and “Create a new port” (Whaa??). Pick standard TCP port->Next-Enter your printer’s IP address which will create a port name for you, then click next. Click finish and wait for windows to find your printer. Then you select your printer make and model from the dropdowns. The rest is a series of clicking “next” or “finish” until it finally prints a test page.

Ubuntu 8.04:
System->Administration->Printing->New Printer->Pick printer from scanned printers list->pick make (already highlighted)->pick model (already highlighted)->Look through additional hardware list (or just press forward)->pick a printer name and click apply. Yes, that’s it. Really. And, I am told it’s easier yet on the new Ubuntu (haven’t tried yet).

To be fair, I do remember when getting printing working on a Linux/Unix box was a complete nightmare, but my point is that *Linux* has advanced _considerably_. ‘Nuff said.

More CentOS

tpt23
I know, I know. I wrote earlier about how the T23 was suffering some sort of display death again and would undoubtedly end up on freelinuxbox.org. While that is definitely true, I was looking at it today and thought I’d start it up again and let it do it’s updates. I did and the display was working the whole time, so I thought I would play with it a little more….:

I wanted to test getting some multimedia playback on this distribution. You see, RedHat based distributions are notorious for following the letter of the law and not letting you have access to any of those nasty codecs we all like to use. You know the ones I am talking about, mp3, wmv, dvd, etc.. Well, since I just happened to be traveling abroad in europe for a few minutes where this is completely legal, I decided to have a go at it.

A quick search brought me to this website and the directions looked pretty thorough so that’s where I started. The only thing I added to the process was adding vlc, my favorite media player, and everything else worked beautifully. To recap, follow these instructions, taken from the previously mentioned website and only edited to add vlc.

rpm -Uhv http://apt.sw.be/redhat/el5/en/i386/RPMS.dag/rpmforge-release-0.3.6-1.el5.rf.i386.rpm
rpm -Uhv http://linuxdownload.adobe.com/adobe-release/adobe-release-i386-1.0-1.noarch.rpm
yum -y install libdvdcss libdvdread libdvdplay libdvdnav lsdvd mplayerplug-in mplayer mplayer-gui compat-libstdc++-33 flash-plugin gstreamer-plugins-bad gstreamer-plugins-ugly vlc
wget www1.mplayerhq.hu/MPlayer/releases/codecs/mplayer-codecs-20061022-1.i386.rpm ; rpm -ivh mplayer-codecs-20061022-1.i386.rpm
wget www1.mplayerhq.hu/MPlayer/releases/codecs/mplayer-codecs-extra-20061022-1.i386.rpm; rpm -ivh mplayer-codecs-extra-20061022-1.i386.rpm

Now a couple notes….

Although I have not yet rebooted to check if that has any effect, the default media player, Totem, still does not play very much. While slightly dissapointed, I never really liked Totem anyhow and found that to be the case on almost every distribution. VLC, however, works exactly as expected, which is, perfectly.

I also took pains to install xmms, my favorite mp3 player on the T23 as well and, although it installed fine from the Dag repos, it doesn’t play a dang thing. VLC to the rescue again. In fact, I hadn’t realized that VLC actually makes such a good audio player!

It is important to also note that I still really feel that this CentOS desktop runs quite well – very snappy. I know I keep saying that, but it really is quite noticeable on this older laptop.